
Source Control Management Concepts
So the first question you might have regarding source/version control is - what is it, and why is it used? To answer that, consider this scenario. I, developer A, wants to communicate with developer B with respect to a particular piece of code or even an entire project. It could be some collaboration ranging from just discussing how the architecture of the code could be improved, or it could be just developers collaborating on adding some features to the app – normal incremental development stuff. How would these developers go about doing that?
First, let’s degrade our thinking a bit and consider the most stupid way one can solve this problem. WhatsApp is one way we can share code. However, doing so is only practical if there is only one file to be shared – homework lab questions for example. It very quickly becomes an unnecessarily burdening technique if one was to use it for development scenarios, for example, in higher semesters you will be developing projects and making applications as a part of your course structure. Just imagine sending 2000+ files through WhatsApp and you’ll know what I’m talking about.
So that’s out of the way. Now, consider Google Drive. It allows a user to upload entire folders, and recently has added a feature to keep different versions of the same folder under the same name as well (pretty sweet)! However, this falls short in terms of development as well. Again, let’s consider some scenarios to better understand why this is the case -
- Developer A and B can now view the same code. However, now, A and B have to work sequentially, not in parallel – that is, if feature 1 and 2 need to be implemented together, first A has to develop 1 and upload the folder, then B has to develop 2 after downloading the updated version of the codebase. This problem cascades disproportionately when the team size reaches 10+ people.
- The above, if not followed – that is if both developers continue to work in parallel, will result in overwriting of folders leading to a loss in features which should be clear enough to understand.
- Bandwidth is also a very important feature to consider. Downloading 200MB codebases every time one wants to implement a feature is VERY excessive for obvious reasons.
Obviously, these make Google Drive a bad option for this specific use case of sharing code. Now consider a system where the current state of the repository is tracked by the changes made in the code in specific files – we don’t upload entire files when we see some change in it, we only upload the changes, signified by line number. This method of version control would solve all our problems listed above, and then some.
Commit
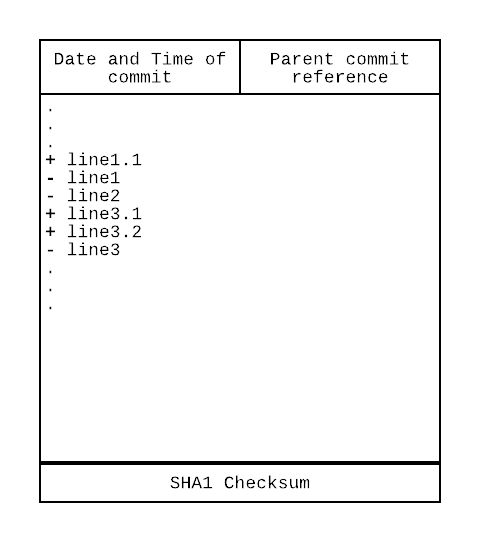
Here, I will introduce to you something called a commit in git terminology. A commit is essentially the atomic unit of what the core/essence of git is. A commit consists of the following things – you can focus on only the first 2 aspects in the below list, since they’re the ones I will be covering immediately.
- Actual changes in the files; tracks the files and folders themselves and detects if there are changes in any file it is tracking.
- Title of the commit and a brief description of what that commit does. This is very important because a new developer joining the team wouldn’t know how the code is implemented and hence wouldn’t be able to decipher what the commit is supposed to be doing just by looking at the changes represented in that commit. To convey what changes were done and why is just as important as making the changes themselves.
- Date and time the commit was created.
- What it’s parent commit is.
- Details of the person who authored the commit.
- Details of the person who committed it to the repository – this point is slightly advanced, so don’t worry if you don’t understand it at this point. It will be explained later on.
- It’s actual structure can perhaps be drawn like this, naively.
Commit History
A commit forms the building block of something known as the commit history. I will be representing the commit in the following manner.
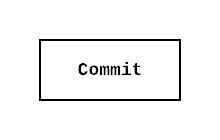
and the commit history like this.
A commit history is essentially commits stacked together in order to represent a code repository’s state at one moment in time. If that doesn’t make sense, you can try imagining stacking commits on top of each other such that the changes they represent get applied to the previous state of the commit history (huge array of commits), which if thought about recursively, will end in the initial commit in the history. The implication of this fact is that the entire repository rests on one single initial commit, which colloquially is called the init commit. If it still doesn’t make sense, don’t worry, it will probably be much clearer after the next few paragraphs.
Branches
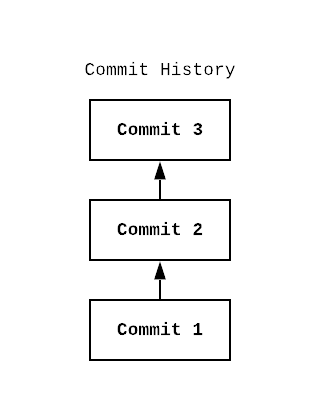
You will now begin to see the benefit of using commits in version control. In git, there is a feature called branches which is mandatory usage for most git version control repositories. A branch could be considered ‘a fork in the commit history’, where for every branch there exists a unique commit history. Let’s say we’re on a branch B1 and we switch to B2. When we do this, the state of the repository in our folder changes from the commit history of B1 to that of B2.
So, our localised commit history through which we got the state of our files changes from 1 –> 2 –> 3 to 1 –> 2 –> 4 –> 5 (can be thought as commit 1 being made as the init commit, on which commit 2 is applied, on which 4 is applied, etc).
There are several branches which are in extensive use by people who work on git today. There is no difference between those and any other branches internally, i.e. git doesn’t discriminate between branches with specific vs non-specific names. The difference in the names of branches solely exists in the minds of the developers working on it, and hence some developers have chosen to name their branches with special names so they can be easily distinguished from others. You can think of it like parts of popular git ‘architectures’ – just a fancy word for structure. These branches include -
- Master branch: Usually, this is considered to be the main branch, where all developers can collaborate to make one central commit history. Usually this is considered a very stable branch; a branch which does not contain many bugs.
- Release branch: This branch is considered to be essentially bug-less. It is meant for the code which is actually used in the release version of the software which is being developed. The release branch is most often the milestone branch.
- Beta branch: This branch contains slightly experimental code. The experimental nature could come from the specific implementation which might have a large amount of bugs, or it could be a result of experimental design choices which haven’t been tested for customer satisfaction.
- There are a few more, but they aren’t relevant enough to be included here.
.git folder and how git implements the above features
This section is probably best written in the form of pointers:
- Data in a commit is stored in .git/ with the file name consisting of (among other things) their SHA1 hashes, which are unique values given to a string. Two unique strings will always have unique SHA1 hashes
- Git constructs the commit histories with references to the commits (the aforementioned SHA1 hashes) and not the commits themselves.
- All branches have their own commit histories.
- A git repository typically his hosted on the cloud, and a local copy is made when a developer either downloads it or clones it.
- The copy of the repository on the cloud is commonly referred to as the
remote. - A
remoteas a git concept doesn’t just end there though. Aremotein a strict perspective is anytrackedrepository not present on your computer. - Generally, the
trackedrepository (a remote) which is owned by the developer working on a solution (i.e. he has the rights to access and modify the code in that repository freely) is called theorigin - and the repository which is not maintained/owned by him (he cannot modify the code directly) is known as the
upstreamrepository.
What is the meaning of tracked?
Files inside a git repository may be in two main states - tracked, or untracked. A tracked file could be seen as a file which is polled by git regularly to see whether there were some changes made to it. If the file is untracked, it goes without saying that git will not check for changes in code made in it.
If a file is tracked, there are two further states that could be assigned to it - staged and unstaged. Actually, scratch that. The files themselves can’t be classified as staged as unstaged strictly speaking. The changes made inside the file are classified as such. There may be two changes in a file, and it’s possible to have only one of the changes in the file in a staged state. A staged state tells git to include that change in the code changes section of the next commit you make.
The following git commands will now make sense with their explanation.
git clone <url>- probably the most used command, git clone will allow you to copy the entire remote repository (pointed to by the url) to your local directory.git init- initialises a ‘local’ git repository within a folder present in your machine.git remote [add|remove|rename] [--options]- this command adds/removes a remote repository to your git project such that the commit history in that repository and consequently it’s branches get tracked against the commit history of your local git repository. Eg.git remote add origin <url of git repository>git checkout- ‘checks out’ a branch, or switches to its commit history.git status- appropriately named, the status command allows us to inspect the status of our repository. It shows us details such as what files were modified, what files were removed, what files were added, etc. It also shows us what branch we are on and what its commit history’s state is with respect to the configured remote.git add [--options] [args]- is a command we use in order to stage all / some of the changes found in a file – we ‘add’ those changes to the ‘stage’ for git.git commit [options]- creates a commit from the staged changes!git push- pushes your commit history to the configured remote (bygit remote add -) by checking the difference in the commit history of the remote branch vs your current branch and uploading only those commits not present in the remote.git pull- exact opposite ofgit push. This command compares the commit history of the remote branch against your current branch and downloads commits which are present in the remote but not on your local machine, thus ‘updating’ your local commit history with the code. This command by default ‘pulls’ the commit histories of all the branches present in the configured remote.git branch- lists the branches present in your local/remote repository. Options to this command also allows us to create new branches. New branches clearly don’t have an appropriate reference to compare to in the remote, hence get pushed directly when usinggit push.git log- allows a user to see the entire commit history. This command has a LOT of modifications in order to make it more useful in daily life, I highly recommend researching about a few of them.
With all the above commands, if you still had an inkling of a doubt, things will get much clearer once you start using git. So, get to it! I’ll see you in the next blog where we cover the more advanced concepts of git.
Extra documents -
- One excellent resource for getting into and using git now that you have learnt the basic concepts, is this website.
- CS students at Stanford have an excellent website which is an excellent resource for going into the depths of git.
- git-scm.com is also an excellent resource, being the documentation – it should be noted that one need not get discouraged by the complexity on this website, not many people truly understand everything git.